AI Photo Editing Prompts: How to Enhance, Restore and Fix Your Own Photos
Most people who open an AI image tool do not want a brand new picture. They want their own photo fixed: a blurry shot made clear, an old family photo restored, a messy background cleaned up. The tool can do all of that, but only if the instruction you give it is clear. That instruction is called an editing prompt, and writing it well is a learnable skill.
What Is an AI Photo Editing Prompt?
An AI photo editing prompt is a short written instruction that you give to an AI tool, together with your own photo, telling it exactly what to change. It is different from a generation prompt, which creates a new image from nothing. An editing prompt works on your real photo, so the result should still look like you, with your face, clothes and the moment itself kept recognisable.

Editing, Generating and Image to Prompt: What Is the Difference?
These three terms get mixed up often, and they do three different jobs:
| Method | What it does | What you start with | Example words | Keeps your real face? |
| Editing prompt | Changes a photo you upload | Your own photo plus a written instruction | “Make it sharper, keep my face exactly the same” | Yes, that is the whole point |
| Generation prompt | Creates a brand new image | Only a written description | “A portrait of a woman in a garden at sunset” | No, it invents a person |
| Image to prompt | Describes a photo in words, so you can reuse the style | A photo you want to copy the look of | “Describe this photo as a detailed prompt” | It changes nothing, it only describes |
If your goal is to fix or improve a photo of yourself, the editing prompt is the right tool. Generation is for new images, and image to prompt is for studying how an existing image was made.
The 4 Parts of an Editing Prompt That Works
A good editing prompt has four parts, always in the same order:
1. The change. Name one main change, such as sharpen this photo, restore this old photo, or change the background.
2. What must stay the same. Say in plain words that your face, expression and clothes must not change. This is the part most people skip, and it is the part that matters most.
3. Light and quality. Ask for natural light and a sharp, clear result that looks like a real photo, not a painting or a cartoon.
4. What to avoid. No extra people, no new objects, no beauty filter, unless you actually want them.
How to Use an Editing Prompt, Step by Step
1. Pick the photo. Choose the clearest version you have. A better starting photo always gives a better result.
2. Choose one fix. Decide the single most important change, such as removing blur or repairing damage.
3. Write or copy the prompt. Use the four parts above, and change the details so they match your photo.
4. Run it and compare. Put the result next to the original and check the face first, then the background and clothes.
5. Adjust one detail and run again. If something drifted, strengthen that line, for example by repeating that the face must stay exactly the same, instead of rewriting the whole prompt.
4 Copy Paste Prompts for the Most Common Fixes
These four prompts cover the jobs people ask for most often, and each one follows the four part structure above. You can paste them into ChatGPT or Gemini with your photo and adjust the details.
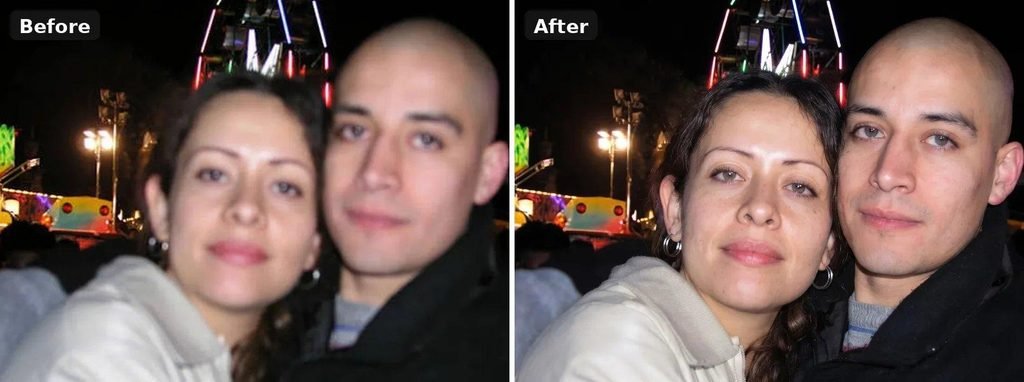
3: 1. Enhance a Blurry or Low Quality Photo
Enhance this photo and make it sharp and clear. Remove the blur and noise, fix the lighting, and improve the colours so they look natural. Keep my face exactly the same. Do not change my features, hairstyle or clothes. The result should look like a clean photo taken on a good phone camera.
If you do not want to build prompts like this from zero every time, ready made collections of ai photo editing prompts keep tested versions of the common fixes in one place, so you can copy one and change only the details that differ.
3: 2. Restore an Old Family Photo
Restore this old family photo in full natural colour and high quality HD, crisp and sharp. Remove all scratches, dust, stains, folds and faded patches, fix the washed out areas, and make the light even everywhere. Keep every face 100% exactly the same as the original, with the same expressions, hairstyles, clothes and poses. Do not smooth or soften any face. Keep fine real details: hair strands, natural skin texture and the folds and texture of the clothes. Colours must be natural and realistic with true skin tones, never bright or oversaturated. Do not add, remove or change any person, and do not change the background. No blur and no soft focus anywhere. The result must look like a real photograph restored by a professional, not a painting and not AI generated.
Restoration is where the stay the same rule matters most. Old family photos carry real memories, and even a small change to a face makes the photo feel wrong to the people who knew that person.
3: 3. Clean Up or Change the Background
Change the background of this photo to a bright, clean room with soft daylight. Keep me exactly the same, with the same face, clothes and pose, and natural light on my face that matches the new background. Remove all other people and objects from the background.
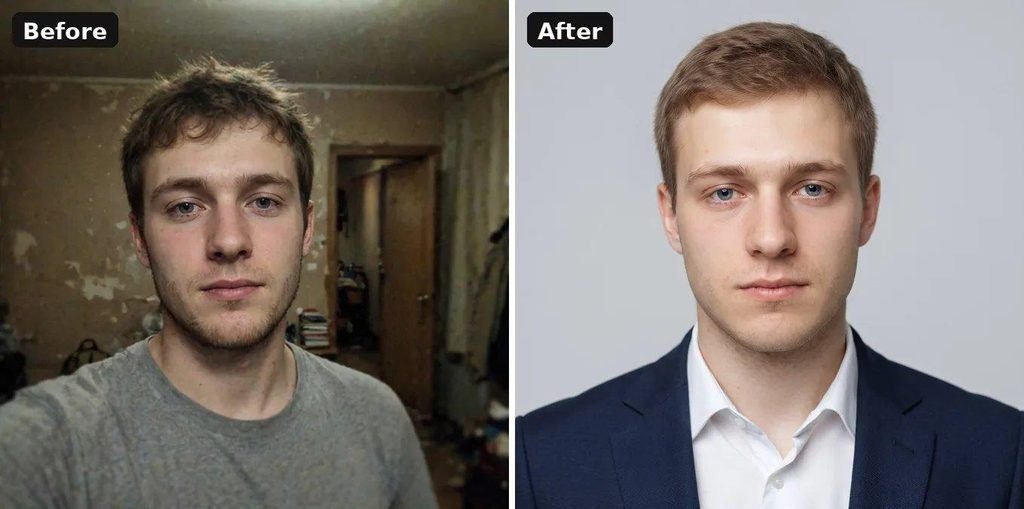
3: 4. Turn a Selfie Into a Professional Headshot
Turn this selfie into a clean professional headshot. Keep my face exactly the same, with the same features and expression. Change my outfit to a formal dark blazer over a plain shirt, and set a plain light background with soft, even light. The photo should look like a studio headshot made for a resume or a LinkedIn profile.
A headshot is the one edit where changing the clothes is the point of the prompt. Everything else, above all the face, stays protected by the same stay the same line.
Why Does AI Change Your Face, and How Do You Stop It?
AI tools do not edit a photo the way a person with a brush would. They rebuild the image from your photo and your words, and anything your words do not protect can be reinterpreted. The face has the most detail, so it drifts first: skin gets smoothed, features shift slightly, and the result looks like a relative of you instead of you.
Google’s own Gemini team describes this failure in nearly the same words. Announcing its updated image editing model in August 2025, Google wrote that when you edit pictures of people you know well, “subtle flaws matter”, because a depiction that is “close but not quite the same” does not feel right. That update was built to make photos of people “look consistently like themselves”. A good prompt simply asks for the same thing, in your own words.
(Source: Google, “Nano Banana: Image editing in Google Gemini gets a major upgrade”, blog.google, August 2025.)
Three habits stop most of it. Put the face line near the start of the prompt, not at the end. Ask for one change at a time, so the tool has less freedom to rebuild the rest. And ask for a real photo look with natural light, which keeps the tool away from the polished, airbrushed style where faces change the most.
Quick Reference: What to Ask For
| Your goal | Copy paste this line |
| Fix a blurry photo | “Enhance this photo, sharpen it, remove the noise, fix the light, and keep my face exactly the same.” |
| Restore an old photo | “Restore this old photo, remove the scratches, repair the damage, restore the colours, and do not add or remove any person.” |
| Change the background | “Change the background to a bright, clean room with soft daylight, and keep the same face, same clothes and same pose, with light on my face that matches.” |
| Make a clean headshot | “Turn this photo into a clean headshot with a plain background and even light, sharper detail, the same face and no beauty filter.” |
| Remove a person behind you | “Remove the person in the background completely, and keep me and everything else in the photo unchanged.” |
| Fix a dark, dull photo | “Brighten this photo and balance the colours so it looks natural, keep my face exactly the same, and do not oversaturate the colours.” |
3 Mistakes That Ruin an Edited Photo
Writing “make it better”. This tells the AI nothing, so it guesses, and it usually guesses wrong. Name the exact fix you want.
Asking for five changes at once. One prompt should carry one main job. Run the photo through a second prompt for the next fix instead of stacking everything into one long request.
Forgetting the face line. Without a clear instruction to keep the face the same, most tools smooth the skin or reshape features a little. The photo may look polished, but it stops looking like you.
Do Not Want to Write Prompts? Use a Generator
If writing the wording yourself feels slow, an ai photo editor prompt generator builds the prompt for you. You choose the change, the style and the details, and it writes the full instruction, ready to paste into Gemini or ChatGPT with your photo. It is the same four part structure, just filled in for you.
FAQs
Can AI edit my photo without changing my face?
Yes, if the prompt says so clearly. Add a line that your face must stay exactly the same, with the same features and expression. Tools follow this instruction well when it is stated directly, and most face changes happen only because the prompt never mentioned it.
How do I enhance a photo in ChatGPT?
Upload the photo, then paste an enhancement prompt that names the fixes you want, such as sharper detail, less noise and better light, together with the line that your face must stay exactly the same. ChatGPT returns the edited image, which you can download. The same prompt also works in Gemini.
Which tool works better with editing prompts, ChatGPT or Gemini?
Both accept the same style of prompt, and the wording matters more than the tool. People commonly use Gemini for photo edits of themselves and ChatGPT for enhancement and restoration prompts. Start with the tool you already have, and use the same four part structure in both. For a full side by side breakdown of the two, see this Gemini AI vs ChatGPT comparison.
Why did the AI change things I did not ask for?
Because the prompt only named the change and said nothing about what must stay the same. Anything you do not protect is free for the tool to reinterpret. Add the ‘stay the same’ line for your face, clothes and the people in the photo, and the unwanted changes mostly stop.
Conclusion
You do not need a new photo to get a better photo. Pick one fix, write it as one clear change, protect your face with a stay the same line, and ask for natural light and a real photo look. Start with the blurry photo prompt above, compare the result with your original, and adjust one detail at a time until it looks like the photo you meant to take.